
How to Add Your Tour Packages
Welcome to ATX Africa, a digital tourism marketplace connecting African tourism businesses with travellers, travel agencies, DMCs and other tourism professionals around the world.
This guide explains how to create and submit your tour packages using the ATX Africa supplier dashboard.
Whether you offer wildlife safaris, mountain trekking, beach holidays, cultural experiences, adventure tours or other tourism activities, you can use this guide to enter your package information, configure pricing and availability, select relevant attributes, and submit your package for activation.
Before you begin, prepare your package title, description, destination, pricing, itinerary, inclusions, exclusions and relevant images. Accurate and complete information helps travellers understand your experience and makes your package easier to discover.
STEP 1: Visit ATX Africa and Click “Login”
Visit the official ATX Africa website:
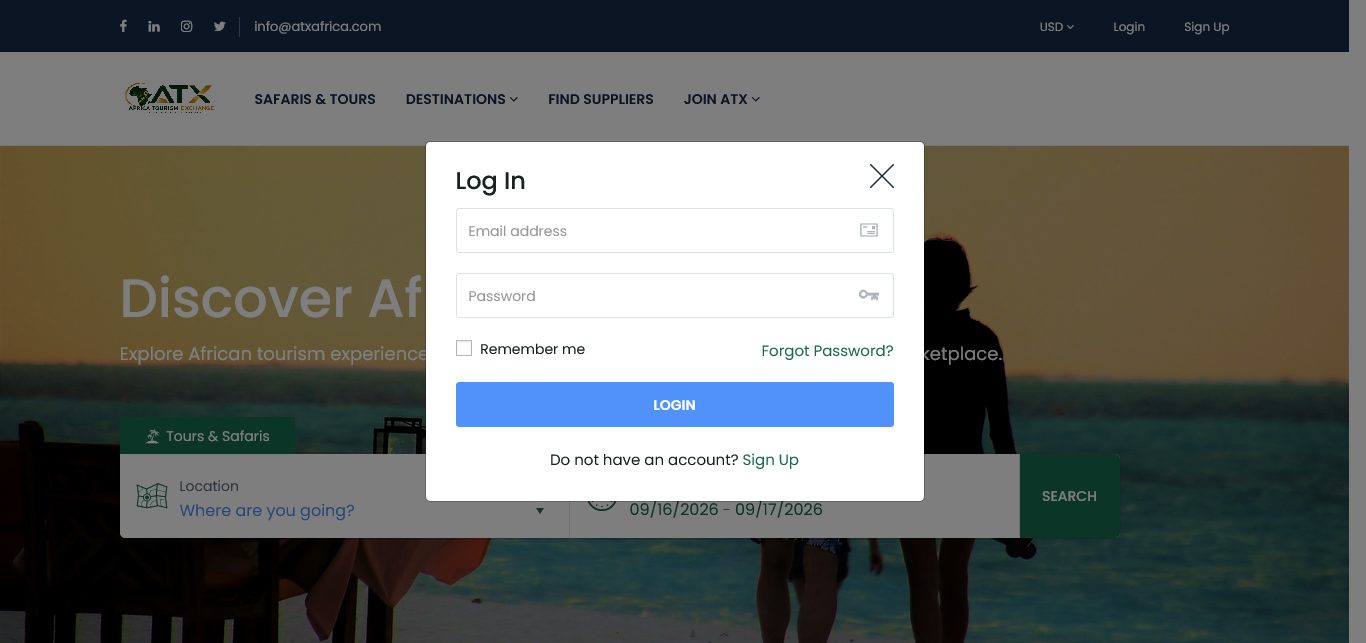
On the homepage, locate the Login option in the top navigation and click it.
A login window will appear, allowing you to access your supplier account.
Why do you need to log in?
Your tour packages are created and managed inside your ATX Africa account. Logging in gives you access to your supplier dashboard, where you can manage your company profile, create tours, review bookings and access other available account features.
If you do not yet have an account, click Sign Up and complete the registration process before continuing.
Important: Always use the official ATX Africa website when accessing your account.
STEP 2: Enter Your Email Address and Password
After clicking Login, a login form will appear with the following fields:
- Email address
- Password
- Remember me
- Forgot Password?
- LOGIN
Email address
Enter the email address you used when registering your ATX Africa account.
Make sure the email address is correct and that you can access it. This is important because your account-related communication and password recovery may depend on it.
Password
Enter the password associated with your account.
Passwords are case-sensitive, so ensure that you enter the correct combination of letters, numbers and special characters.
Remember me
The Remember me checkbox allows you to keep your login session remembered, depending on your browser and account settings.
Only use this option on a personal or trusted device. Avoid enabling it on a public computer or a device shared with people you do not trust.
Forgot Password?
If you cannot remember your password, click Forgot Password? and follow the password recovery instructions.
LOGIN
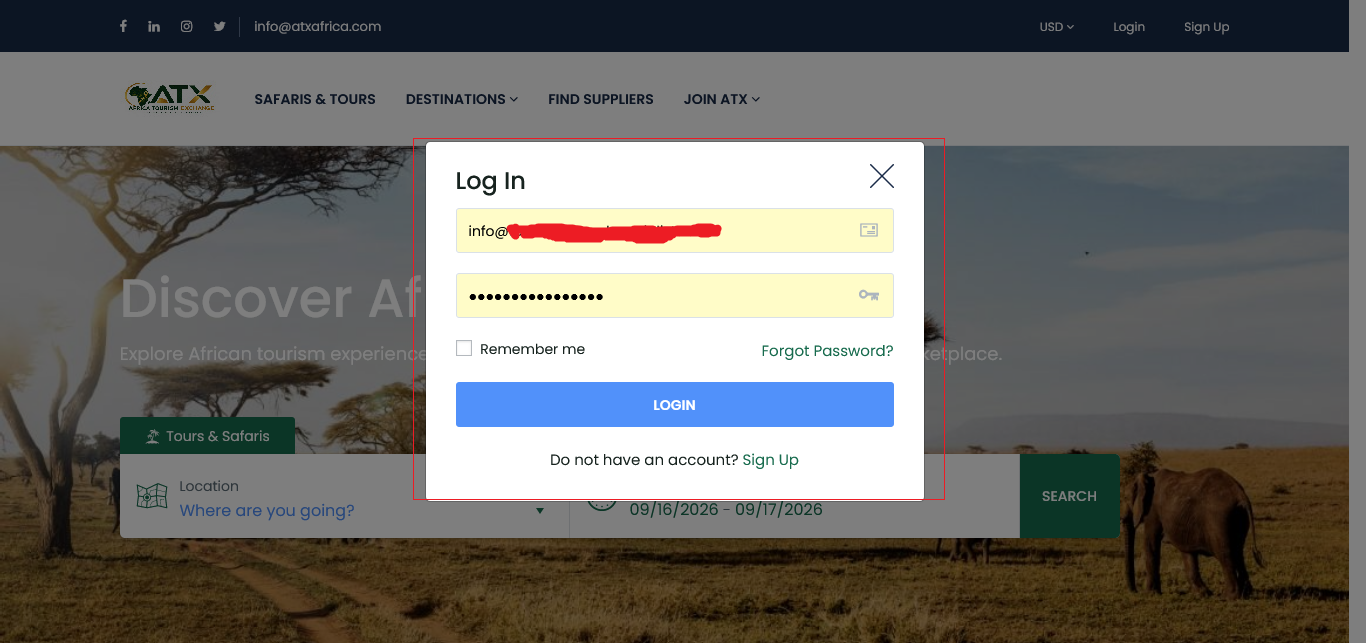
After entering your email address and password, click LOGIN to access your account.
Security reminder: Never share your password with unknown individuals. Keep your account credentials secure.
STEP 3: Confirm Your Account and Open the Account Menu
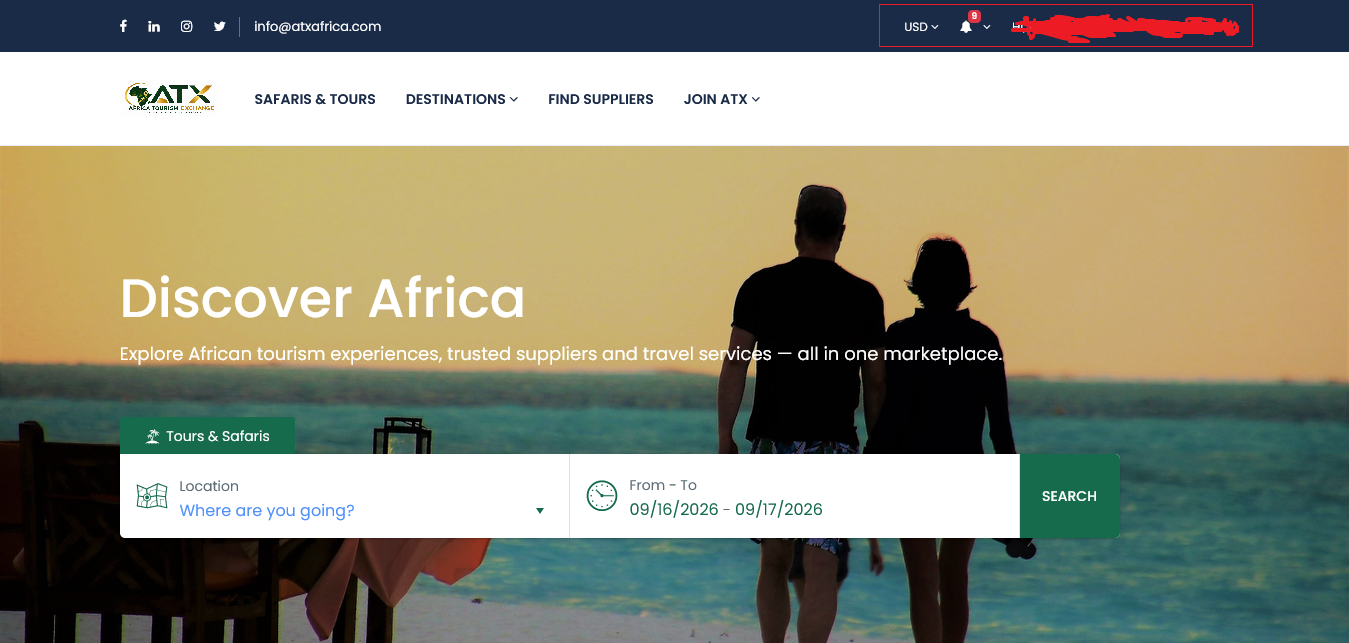
After successfully logging in, look at the upper-right corner of the website.
You will see your account name or account menu. Click on it to open the available account options.
In the screenshot, the account menu includes:
- Vendor Dashboard
- My profile
- Messages
- Booking History
- Change password
- My plan
- Logout
What should you do at this stage?
Confirm that you are logged into the correct supplier account before continuing.
If you manage more than one tourism business or account, make sure you are using the account where you want to create the package.
Why is this important?
Your tour packages are connected to your supplier profile. The company information, contact details and other profile information associated with your account help travellers understand which business is offering the experience.
Tip: Before adding packages, make sure your My profile information is accurate and professional.
STEP 4: Click “Vendor Dashboard”
From the account menu, click Vendor Dashboard.
The Vendor Dashboard is the main management area for your supplier account.
In the screenshot, the dashboard displays several summary sections, including:
- Pending
- Earnings
- Bookings
- Services
It also includes an Earning Statistics section.
What is the Vendor Dashboard used for?
The dashboard provides access to the tools available for managing your tourism business on ATX Africa.
Depending on your account and the features available, you may use it to:
- Manage tour packages
- Review booking information
- Access booking reports
- Manage enquiries
- View messages
- Manage your supplier profile
- Access your plan and account settings
Important
The dashboard is your starting point for creating and managing packages. From here, you will open Manage Tour to begin adding a new tour.

STEP 5: Open “Manage Tour”
Inside the Vendor Dashboard, locate Manage Tour in the left-hand navigation menu and click it.
The Manage Tour section is highlighted in the screenshot.
What is Manage Tour?
This is the section where you manage your tour listings.
It gives you access to the tools used to create, view and maintain your packages on ATX Africa.
Why is this step important?
Every tour package you create is managed through this section. It is also where you can return later to update an existing package, review its status or create another tour.

STEP 6: Select “Add Tour”
After clicking Manage Tour, a submenu will appear.
In the screenshot, the submenu includes:
- All Tours
- Add Tour
- Availability
- Recovery
Click Add Tour to begin creating a new tour package.
What happens next?
The system will open the Add new tour page.
At the top of this page, you will see the package creation tabs:
1. CONTENT → 2. LOCATIONS → 3. PRICING → 4. AVAILABILITY → 5. ATTRIBUTES → 6. ICAL
These sections allow you to enter and configure the different parts of your package.
Tip: Prepare your package information before starting so that you can complete the form accurately and efficiently.

STEP 7: Complete the “CONTENT” Section
After clicking Add Tour, the system opens the Add new tour page.
The first tab is 1. CONTENT.
This section is where you enter the main information that introduces and describes your tour package.
The screenshot shows the following fields and sections:
- Title
- Content
- Category
- Youtube Video
- Minimum advance reservations
- Duration
- Tour Min People
- Tour Max People
- FAQs
- Include
- Exclude
- Itinerary
- Border Image
- Gallery
- Featured Image
- Save Changes
Let us look at each one carefully.
7.1 Title
The Title field is where you enter the name of your tour package.
Your title should clearly communicate what the experience is about.
A good title should normally include some combination of:
- Main destination
- Type of experience
- Duration, where relevant
- Route or major attraction, where relevant
Examples
Wildlife safari:
5-Day Serengeti and Ngorongoro Wildlife Safari
Mountain trekking:
7-Day Mount Kilimanjaro – Machame Route
Beach holiday:
4-Day Zanzibar Beach Holiday and Stone Town Experience
Cultural experience:
3-Day Maasai Cultural and Wildlife Experience in Tanzania
Why the title matters
The title is one of the first things travellers and travel professionals see when browsing packages.
A clear title helps them understand your offer quickly and makes your listing easier to identify.
Avoid vague titles
Avoid titles such as:
Safari Package 1
Best Tour
Amazing Holiday
These titles do not explain what the customer is actually purchasing.
Tip: Write a title that is informative, professional and relevant to the actual package.
7.2 Content
The Content field is the main text editor where you describe your tour package.
The screenshot shows a text editor with formatting tools that allow you to structure your description.
This is where you explain the experience in more detail.
What should you include?
A good package description should explain:
- What the package offers
- Where the experience takes place
- What activities are included
- What travellers can expect
- What makes the experience interesting
- Who the package may be suitable for
- Any important information travellers should know
Recommended structure
You can organise your description using:
Introduction
A short overview of the package.
Experience Highlights
The main attractions, activities or experiences.
What Travellers Can Expect
A clear explanation of what the journey or activity involves.
Who This Package Is Suitable For
For example, couples, families, solo travellers, groups or adventure travellers.
Example
Experience the beauty of northern Tanzania on this 5-day wildlife safari through Tarangire National Park, Serengeti National Park and the Ngorongoro Conservation Area. Enjoy guided game drives, discover diverse landscapes and explore some of Tanzania’s remarkable wildlife destinations. This safari is suitable for travellers looking for a private and immersive African wildlife experience.
Writing best practices
- Use clear and natural English.
- Write for travellers, not only for tourism professionals.
- Use short paragraphs.
- Use headings and bullet points where helpful.
- Avoid exaggerated claims.
- Make sure the description matches the actual package.
- Do not copy another company's description.
- Explain local terms that international travellers may not understand.
Important: The Content section describes the specific package, not your entire company. Your company introduction belongs in My profile.
7.3 Category
The Category field allows you to select the category that best represents your tour package.
In the screenshot, the field displays:
-- Please Select --
Click the dropdown and choose the relevant category available in your account.
Why category matters
The category helps ATX organise packages and makes it easier for travellers to discover experiences that match their interests.
For example, depending on the categories available in the system, a package may belong to a category related to:
- Wildlife
- Mountain trekking
- Beach holidays
- Cultural experiences
- Adventure
- Nature
- Other tourism activities
Best practice
Choose the category that accurately describes the main experience.
Example: A Mount Kilimanjaro trekking package should not be placed in an unrelated category simply because that category is popular.
Important: Select the most appropriate category available in your dropdown. The exact options may depend on the ATX configuration.
7.4 Youtube Video
The Youtube Video field allows you to add a YouTube video related to your package.
The screenshot shows a field with the placeholder:
youtube video
What can you add?
You can use a relevant video showing:
- The destination
- The activity
- The tour experience
- The landscape
- Accommodation
- A cultural or adventure experience
Example
For a Kilimanjaro package, you may use a video showing the route, trekking experience or mountain environment.
For a Zanzibar package, you may use a video showing the beach, Stone Town or activities included in the package.
Best practices
- Use a video that is relevant to the package.
- Make sure the video accurately represents the experience.
- Avoid using unrelated videos.
- Avoid using videos that create expectations your package cannot fulfil.
Important: Only add a video if you have a relevant one. Do not add an unrelated video simply to fill the field.
7.5 Minimum advance reservations
The Minimum advance reservations field allows you to specify the minimum advance booking time required for your package, where applicable.
The screenshot includes the instruction:
Leave blank if you don't need to use this option
What does this mean?
Some packages require preparation before the travel date.
For example, a supplier may need time to arrange:
- Accommodation
- Transport
- Guides
- Park permits
- Mountain permits
- Special activities
- Other operational arrangements
If your package requires advance booking, you can use this field according to the available system settings.
Important distinction
This field is not the duration of the tour.
- Minimum advance reservations = How early the customer needs to reserve.
- Duration = How long the tour itself lasts.
Example
A package may last 5 days, but the supplier may require reservations several days or weeks in advance.
Important: If you do not need to use this option, the screenshot specifically indicates that you can leave it blank.
7.6 Duration
The Duration field allows you to enter the length of your tour package.
In the screenshot, the field is accompanied by a unit selector showing:
hours
What should you enter?
Enter the duration that accurately represents the experience.
For example:
- A half-day activity may be entered in hours.
- A full-day activity may be entered according to the duration used by the system.
- A multi-day package should be entered according to the duration format supported by the platform.
Important
Your duration should match:
- The package title
- The package description
- The itinerary
- The actual experience offered
Example: If your title says 5-Day Serengeti Safari, the duration should not contradict that information.
7.7 Tour Min People
The Tour Min People field allows you to specify the minimum number of people required for the tour.
Examples
- A package accepting solo travellers may have a minimum of 1.
- A private tour designed for couples may have a minimum of 2.
- A group experience may require a specific minimum number of participants.
Why this matters
This helps communicate the minimum group size required for the package.
Best practice
Enter the minimum number that your company can realistically accommodate under the package's conditions.
Do not enter a minimum that does not match your actual operating arrangements.
7.8 Tour Max People
The Tour Max People field allows you to specify the maximum number of people the package can accommodate.
Examples
- A private safari designed for up to 6 people may have a maximum of 6.
- A group tour may have a maximum capacity based on the vehicle, guide, accommodation or activity.
- A small cultural experience may have a limited number of participants.
Why this matters
It helps travellers understand the expected group size and helps suppliers communicate their capacity clearly.
Tip: Make sure the maximum number is realistic and consistent with the actual service you provide.
7.9 FAQs
The FAQs section allows you to add frequently asked questions about your package.
In the screenshot, the section contains two columns:
Title | Content
There is also an Add item button.
How to use this section
Click Add item to create a new FAQ.
For each FAQ:
- Title = The question
- Content = The answer
Example 1
Title: Is this safari private or group-based?
Content: This package is offered as a private safari. Please contact the supplier for group arrangements.
Example 2
Title: What should I bring for the safari?
Content: Travellers should bring comfortable clothing, sun protection, personal essentials and any other items recommended by the supplier before departure.
Example 3
Title: Is airport transfer included?
Content: Please check the package inclusions or contact the supplier for confirmation.
Good FAQ topics
You may include questions about:
- Group size
- Private or shared arrangements
- What to bring
- Airport transfers
- Meals
- Accommodation
- Children
- Fitness requirements
- Travel conditions
- Booking requirements
- Important restrictions
Best practices
- Add questions that customers are likely to ask.
- Keep answers clear and accurate.
- Avoid making promises that are not guaranteed.
- Make sure the answers match your package details.
Tip: FAQs help reduce uncertainty and allow travellers to understand your package before sending an enquiry.
7.10 Include
The Include section allows you to list the services or items included in your package.
In the screenshot, the section contains:
- Title
- Add item
How to use it
Click Add item to add an inclusion.
Each item should describe one service or benefit included in the package.
Examples
Title: Accommodation
Content: Accommodation as specified in the itinerary.
Title: Professional Guide
Content: Services of a professional guide throughout the safari.
Title: Transport
Content: Transport as specified in the package itinerary.
Title: Park Fees
Content: Park fees included according to the package arrangements.
Other possible inclusions
Depending on your package, you may include:
- Meals
- Airport transfers
- Selected activities
- Camping equipment
- Drinking water
- Accommodation
- Guide services
- Transport
Important
Only list services that are genuinely included in the package price or package arrangements.
Do not include services that the customer must pay for separately.
7.11 Exclude
The Exclude section allows you to list services or costs that are not included in the package.
The screenshot contains:
- Title
- Add item
Examples
Title: International Flights
Content: International flights are not included in the package price.
Title: Travel Insurance
Content: Travel insurance is not included and should be arranged by the traveller.
Title: Personal Expenses
Content: Personal expenses are not included in the package price.
Other possible exclusions
Depending on your package, exclusions may include:
- Visa fees
- Tips
- Personal purchases
- Optional activities
- International flights
- Travel insurance
- Items not specifically mentioned in the inclusions
Why this matters
Clear exclusions help travellers understand what they are paying for and what additional costs they may need to plan for.
Important: Make sure your exclusions match the actual package conditions.
7.12 Itinerary
The Itinerary section allows you to add the daily programme or sequence of activities for your tour.
In the screenshot, the section contains the columns:
Image | Title | Content
There is also an Add item button.
How to use it
Click Add item to create an itinerary entry.
For each entry, you can provide:
- Image = A relevant image for that itinerary entry, where applicable
- Title = The day or activity title
- Content = The detailed explanation of what happens
Example
Title: Day 1: Arusha – Tarangire National Park
Content: Depart from Arusha and travel to Tarangire National Park for a guided game drive. Enjoy the park’s landscapes and wildlife before continuing to your accommodation.
Title: Day 2: Tarangire – Serengeti National Park
Content: Travel towards Serengeti with opportunities for wildlife viewing along the way. Arrive at your accommodation and enjoy an evening in the park.
What makes a good itinerary?
A good itinerary should explain:
- Where the day begins
- Where the traveller goes
- Main activities
- Important travel information
- Meals, where applicable
- Accommodation, where applicable
Best practices
- Use a logical order.
- Keep the itinerary consistent with the duration.
- Make sure it matches the package description.
- Mention long travel days where relevant.
- Avoid promising activities that depend on conditions you cannot guarantee.
- Use relevant images where appropriate.
Tip: A clear itinerary helps travellers understand the experience before they enquire.
7.13 Border Image
The Border Image section contains an Upload Image button.
This section allows you to upload an image associated with your tour package.
What kind of image should you use?
Choose an image that:
- Is relevant to the package
- Represents the experience accurately
- Has good quality
- Is clear and visually appealing
- You have permission to use
Example
For a wildlife safari, you may use a relevant wildlife or safari landscape image.
For a mountain trekking package, you may use an image showing the mountain environment or trekking experience.
Important: Avoid using images that do not represent the actual package.
7.14 Gallery
The Gallery section contains a button labelled:
Select images
This allows you to select multiple images for your package.
What should your gallery show?
Depending on the package, you may include images of:
- Destinations
- Activities
- Accommodation
- Landscapes
- Wildlife
- Beaches
- Mountains
- Cultural experiences
- Vehicles
- Other relevant experiences
Why is the gallery important?
A gallery helps travellers visualise the experience before sending an enquiry.
Best practices
- Use relevant, high-quality images.
- Choose images that represent the actual package.
- Avoid uploading too many unrelated images.
- Avoid blurry or misleading photos.
- Make sure you have the right to use the images.
Tip: Select images that help customers understand what they can expect from the package.
7.15 Featured Image
The Featured Image section contains an Upload Image button.
This is where you upload the main image that represents your package.
What makes a good featured image?
Choose an image that:
- Clearly represents the package
- Is visually attractive
- Has good quality
- Is relevant to the destination or experience
- Makes the package easy to recognise
Examples
For a Serengeti safari, use a relevant safari or wildlife image.
For a Zanzibar beach holiday, use a relevant beach or island experience image.
For a Kilimanjaro trek, use a relevant mountain or trekking image.
Important: The featured image should represent the package accurately. Avoid using an unrelated image simply because it looks attractive.
7.16 Save Changes
At the bottom of the Content page, you will see the Save Changes button.
After entering your information, review the fields and click Save Changes to save your package details.
Before saving, check:
- Title
- Content
- Category
- Duration
- Minimum and maximum people
- FAQs
- Inclusions
- Exclusions
- Itinerary
- Images
Important: Save your work before leaving the page so that your information is not lost.

STEP 8: Complete the “LOCATIONS” Section
The second tab is 2. LOCATIONS.
This section allows you to specify where your tour takes place and add relevant surrounding attractions.
The screenshot shows:
- TOUR LOCATIONS
- Location
- Real tour address
- SURROUNDINGS
- National Parks & Game Reserves
- Beach & Marine Parks
- Mountains & Trekking
- Lakes & Water Attractions
- Historical & Cultural Heritage
- Primate & Forest Reserves
- Tourism Hubs & Cities
- Desert Tours
- Coastal Tours
- Add item
- Save Changes
8.1 Location
The Location field allows you to select the main destination associated with your package.
In the screenshot, the field displays:
-- Please Select --
Click the dropdown and select the appropriate location available in your account.
Why location matters
The location helps ATX organise packages and allows travellers to discover experiences in the destinations they are interested in.
Examples
- A Serengeti safari should use the appropriate Tanzania location.
- A Zanzibar beach holiday should use Zanzibar.
- A Kilimanjaro trekking package should use Kilimanjaro.
- A cultural tour should use the relevant destination where the experience takes place.
Best practices
- Select the correct destination.
- Avoid choosing a location simply because it is popular.
- Make sure the location matches the actual package.
- If your package covers multiple destinations, use the appropriate primary location and explain the other locations in your description or itinerary.
8.2 Real tour address
The Real tour address field allows you to enter the actual address or starting location of the tour, where applicable.
What should you enter?
Depending on the nature of your package, this may include:
- The starting point
- The meeting point
- The office or departure location
- The actual location where the experience takes place
- A relevant address associated with the tour
Examples
For a city tour:
Arusha City Centre, Tanzania
For a beach experience:
Stone Town, Zanzibar, Tanzania
For a mountain trek:
Machame Gate, Kilimanjaro, Tanzania
Important
Use an accurate address or location. Do not enter an unrelated address simply to complete the field.
If the package covers several locations, use the most appropriate primary location and explain the route in the itinerary.
8.3 Surroundings
The SURROUNDINGS section allows you to add nearby attractions or relevant tourism locations associated with your package.
The screenshot shows several categories, each with:
- Name
- Content
- Distance
- Add item
These categories include:
- National Parks & Game Reserves
- Beach & Marine Parks
- Mountains & Trekking
- Lakes & Water Attractions
- Historical & Cultural Heritage
- Primate & Forest Reserves
- Tourism Hubs & Cities
- Desert Tours
- Coastal Tours
Why is this useful?
This section helps travellers understand what attractions or tourism areas are associated with your package.
It can also help ATX organise and present packages more effectively around destinations and nearby experiences.
How to add a surrounding attraction
Click Add item under the relevant category.
Then enter the appropriate information in the fields:
- Name = Name of the attraction or location
- Content = A short explanation of the attraction
- Distance = Distance from the tour location, where applicable
Example: National Parks & Game Reserves
Name: Tarangire National Park
Content: A wildlife destination known for its elephants, baobab trees and diverse landscapes.
Distance: Enter the relevant distance from the tour location, where applicable.
Example: Mountains & Trekking
Name: Mount Kilimanjaro
Content: Africa’s highest mountain and a major destination for mountain trekking experiences.
Distance: Enter the relevant distance from the tour location, where applicable.
Example: Historical & Cultural Heritage
Name: Stone Town
Content: A historic urban area in Zanzibar known for its cultural heritage, architecture and historical significance.
Distance: Enter the relevant distance from the tour location, where applicable.
Important
Only add surroundings that are genuinely relevant to your package.
Do not add attractions simply to make your package appear connected to more destinations.
Save Changes
After completing the relevant location and surroundings information, click Save Changes.

STEP 9: Complete the “PRICING” Section
The third tab is 3. PRICING.
This section allows you to configure how your package price is presented and how different pricing options may apply.
The screenshot shows:
- DEFAULT STATE
- Only available on specific dates
- PRICING
- Tour Price
- Price
- Sale Price
- Person Types
- Enable Person Types
- Extra Price
- Enable extra price
- Discount by number of people
- No of people
- Discount
- Type
- Add item
- Save Changes
Let us explain each section.
9.1 Default State
The DEFAULT STATE section contains a dropdown.
In the screenshot, the selected option is:
Only available on specific dates
What does this mean?
This setting determines the default availability state of the tour package according to the options configured in the system.
The selected option indicates that the package is set to be available only on specific dates.
Important
Choose the option that accurately reflects how your package operates.
If your package is only offered on selected dates, this setting may be appropriate.
If your package operates differently, review the available options and select the one that matches your actual availability arrangement.
Tip: The Default State should be consistent with the availability settings you configure in the next tab.
9.2 Tour Price
The Tour Price section contains two fields:
- Price
- Sale Price
Price
The Price field is where you enter the regular price of your tour package.
Example
USD 1,500 per person
or:
USD 3,000 per private group
The correct format depends on how your package is offered.
Sale Price
The Sale Price field allows you to enter a discounted price, where applicable.
For example:
- Regular price: USD 1,500
- Sale price: USD 1,350
Important note shown in the screenshot
The screenshot includes the following instruction:
If the regular price is less than the discount, it will show the regular price
This means you should make sure the pricing values are entered correctly and that the sale price does not create an unintended result.
Best practices
- Use the correct currency.
- Enter a realistic price.
- Make sure the price matches your package details.
- Use Sale Price only when a genuine discounted price applies.
- Make sure your regular and sale prices are accurate.
9.3 Person Types
The Person Types section contains a checkbox labelled:
Enable Person Types
What does this option do?
This option allows you to enable different pricing categories for different types of people, where applicable.
For example, a package may have different prices for:
- Adults
- Children
- Other categories supported by the system
When should you use it?
Use this option if your package genuinely has different prices for different person types.
For example, a family package may have separate adult and child pricing.
Important
Do not enable different person types unless your package has a real pricing difference.
Make sure the prices you enter are clear and accurate.
9.4 Extra Price
The Extra Price section contains a checkbox labelled:
Enable extra price
What does this option mean?
This option allows you to configure an additional price where applicable.
Depending on your package, an extra price may relate to an additional service, option or arrangement.
Examples
An extra price may apply to:
- An optional activity
- An additional service
- A special arrangement
- Another charge supported by the system
Important
Only use this option when the additional price is genuine and clearly explained.
Do not add extra charges that are not relevant to your package.
9.5 Discount by Number of People
The Discount by number of people section allows you to configure discounts based on the number of people booking the package.
The screenshot shows the columns:
- No of people
- Discount
- Type
There is also an Add item button.
How to use it
Click Add item to create a discount rule.
You can then enter the relevant number of people, discount amount and discount type according to the available system options.
Example
A supplier may offer a group discount for larger bookings.
For example:
- No of people: 5
- Discount: 10
- Type: Select the appropriate type available in the system
Important
Make sure the discount rules are accurate and match your actual pricing policy.
Do not enter discounts that your company does not intend to offer.
Save Changes
After completing your pricing information, click Save Changes.

STEP 10: Complete the “AVAILABILITY” Section
The fourth tab is 4. AVAILABILITY.
This section allows you to configure when your tour package can be booked or offered.
The screenshot shows:
- AVAILABILITY
- Fixed dates
- Enable Fixed Date
- Open Hours
- Enable Open Hours
- Date select type
- Date picker
- Save Changes
10.1 Fixed dates
The Fixed dates section contains a checkbox labelled:
Enable Fixed Date
What does this option mean?
This option allows you to enable fixed-date availability for your package.
Fixed dates are useful when your package operates on specific dates rather than being available continuously.
Examples
- Scheduled group departures
- Specific event dates
- Seasonal tours
- Special travel programmes
- Packages offered only on selected dates
When should you use it?
Use Enable Fixed Date if your package is available on specific dates.
For example:
A group safari departing on selected dates throughout the year.
Important
Only enable this option if your package actually operates on fixed dates.
10.2 Open Hours
The Open Hours section contains a checkbox labelled:
Enable Open Hours
What does this option mean?
This option allows you to configure availability based on open hours, where applicable.
It may be useful for experiences that operate during specific hours of the day.
Examples
- City tours
- Museum visits
- Cultural experiences
- Activities with specific operating hours
- Experiences that begin at a particular time
When should you use it?
Use this option when your package has defined operating hours or time slots.
Important
Make sure the hours you configure reflect the actual operating schedule of your experience.
10.3 Date select type
The Date select type field is a dropdown.
In the screenshot, the selected option is:
Date picker
What does this mean?
This setting determines how the customer selects a date when interacting with the package availability system.
The Date picker option allows the user to select a date through a calendar-style date selection interface.
Why is this useful?
It helps travellers choose a date when making an enquiry or booking, depending on the package's configured availability.
Important
Choose the date selection option that matches the way your package operates.
Save Changes
After configuring availability, click Save Changes.

STEP 11: Complete the “ATTRIBUTES” Section
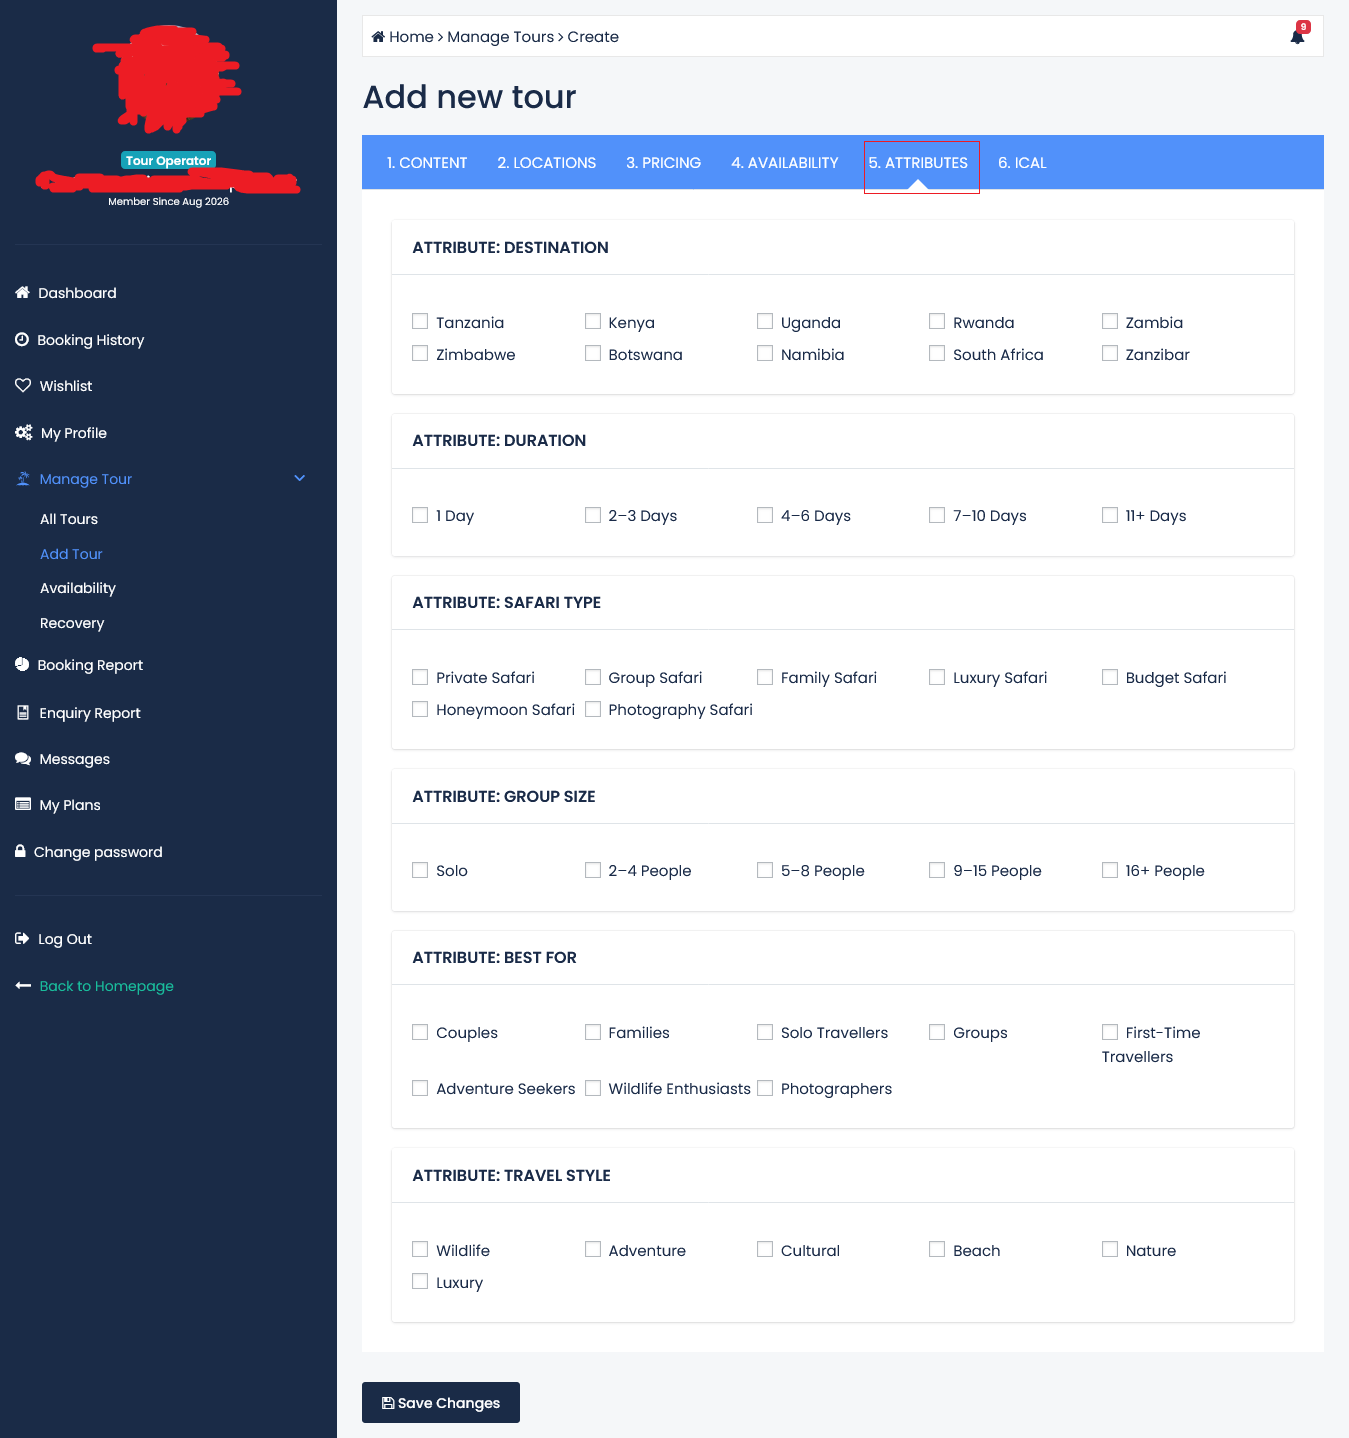
The fifth tab is 5. ATTRIBUTES.
This section allows you to classify your package using specific attributes.
The screenshot shows the following attribute groups:
- ATTRIBUTE: DESTINATION
- ATTRIBUTE: DURATION
- ATTRIBUTE: SAFARI TYPE
- ATTRIBUTE: GROUP SIZE
- ATTRIBUTE: BEST FOR
- ATTRIBUTE: TRAVEL STYLE
Each group contains checkboxes.
Why are attributes important?
Attributes help travellers and travel professionals understand what kind of experience your package offers.
They also help ATX organise packages according to destination, duration, travel style and other characteristics.
Important: Select only the attributes that accurately describe your package.
11.1 Attribute: Destination
The ATTRIBUTE: DESTINATION section includes:
- Tanzania
- Kenya
- Uganda
- Rwanda
- Zambia
- Zimbabwe
- Botswana
- Namibia
- South Africa
- Zanzibar
How to use it
Select the destination or destinations that your package genuinely covers.
Example
For a Tanzania safari:
☑ Tanzania
For a Zanzibar beach holiday:
☑ Zanzibar
For a package covering Tanzania and Zanzibar:
☑ Tanzania
☑ Zanzibar
Important
Do not select destinations that are not part of your package.
11.2 Attribute: Duration
The ATTRIBUTE: DURATION section includes:
- 1 Day
- 2–3 Days
- 4–6 Days
- 7–10 Days
- 11+ Days
How to use it
Select the duration category that matches the actual length of your package.
Examples
A 1-day city tour:
☑ 1 Day
A 5-day safari:
☑ 4–6 Days
A 7-day mountain trek:
☑ 7–10 Days
A 12-day safari:
☑ 11+ Days
Important
The selected duration should match the duration entered in the Content section.
11.3 Attribute: Safari Type
The ATTRIBUTE: SAFARI TYPE section includes:
- Private Safari
- Group Safari
- Family Safari
- Luxury Safari
- Budget Safari
- Honeymoon Safari
- Photography Safari
How to use it
Select the safari type or types that accurately describe your package.
Examples
A private safari:
☑ Private Safari
A family-focused safari:
☑ Family Safari
A photography-focused safari:
☑ Photography Safari
Important
Do not select every option simply to make your package appear in more categories.
Choose only the types that genuinely apply.
11.4 Attribute: Group Size
The ATTRIBUTE: GROUP SIZE section includes:
- Solo
- 2–4 People
- 5–8 People
- 9–15 People
- 16+ People
How to use it
Select the group size that best represents the package.
Examples
A solo traveller package:
☑ Solo
A private safari for 2–4 people:
☑ 2–4 People
A group tour for 9–15 people:
☑ 9–15 People
Important
The selected group size should be consistent with the Tour Min People and Tour Max People fields.
11.5 Attribute: Best For
The ATTRIBUTE: BEST FOR section includes:
- Couples
- Families
- Solo Travellers
- Groups
- First-Time Travellers
- Adventure Seekers
- Wildlife Enthusiasts
- Photographers
How to use it
Select the audiences for whom your package is genuinely suitable.
Examples
A honeymoon safari:
☑ Couples
A family holiday:
☑ Families
A wildlife photography safari:
☑ Photographers
☑ Wildlife Enthusiasts
A beginner-friendly safari:
☑ First-Time Travellers
Important
Choose attributes based on the actual experience, not simply on the audience you want to attract.
11.6 Attribute: Travel Style
The ATTRIBUTE: TRAVEL STYLE section includes:
- Wildlife
- Adventure
- Cultural
- Beach
- Nature
- Luxury
How to use it
Select the travel styles that best describe your package.
Examples
A wildlife safari:
☑ Wildlife
☑ Nature
A Kilimanjaro trek:
☑ Adventure
☑ Nature
A Zanzibar beach holiday:
☑ Beach
A cultural experience:
☑ Cultural
A luxury safari:
☑ Luxury
☑ Wildlife, if applicable
Important
Select only the travel styles that accurately represent the package.
Save Changes
After selecting the relevant attributes, click Save Changes.
STEP 12: Submit Your Package for Activation
After completing the package information, return to Manage Tour → All Tours to review your package.
The screenshot shows the Manage Tours page, where packages are displayed with information such as:
- Package image
- Package title
- Location
- Price
- Status
- Last Updated
It also shows action buttons including:
- Clone
- View
- Edit
- Del
- Make hide
What does “Pending” mean?
After submitting your package, it may remain in a Pending status while the ATX Africa team reviews it and assists with activation.
A pending package has been submitted but is not yet active for public discovery.
What happens next?
The ATX Africa team may review the information and contact you if additional details or corrections are required.
Once the package has been reviewed and activated, it can become available to travellers and travel professionals through the marketplace.
Before submitting, check:
- Title is clear
- Description is complete
- Category is correct
- Location is accurate
- Price is correct
- Availability is properly configured
- Attributes are relevant
- Inclusions and exclusions are accurate
- Itinerary is complete
- Images are relevant and high quality
Important: Submitting a package does not necessarily mean it becomes live immediately. Wait for the package to be reviewed and activated.

Understanding the Package Management Buttons
Once your package appears under Manage Tours, you may see several action buttons.
Clone
The Clone button allows you to create a copy of an existing package.
This can be useful when you want to create a similar package with different details, such as:
- Different duration
- Different route
- Different accommodation category
- Different pricing
- Different inclusions
Important: Review and update the cloned package carefully so that it does not contain incorrect information from the original package.
View
The View button allows you to view the package listing.
Use this to check how your package information appears.
Edit
The Edit button allows you to update an existing package.
You may use it to change:
- Description
- Price
- Availability
- Itinerary
- Images
- Other package details
Del
The Del button is used to delete a package.
Important: Use this carefully. Make sure you are deleting the correct package.
Make hide
The Make hide button allows you to hide a package from public visibility, depending on the system settings.
This may be useful when:
- The package is temporarily unavailable
- You need to update the information
- The package is seasonal
- You no longer want it publicly visible
Best Practices for Creating Professional Tour Packages
Creating a package is not only about filling in the form. It is also about presenting your experience clearly and accurately.
1. Use a Clear Title
Your title should tell travellers what the package is about.
2. Write a Complete Description
Explain the experience, destination, activities and important details.
3. Use Accurate Pricing
Make sure your price matches the actual package conditions.
4. Keep Your Information Consistent
Your title, duration, itinerary, price, location and attributes should all describe the same experience.
5. Use Relevant Images
Choose images that represent the actual package.
6. Explain Inclusions and Exclusions
Help travellers understand what is included and what they may need to pay for separately.
7. Keep Your Package Updated
Review your package regularly and update prices, availability, itinerary and other information when necessary.
8. Avoid Misleading Information
Do not exaggerate destinations, activities, accommodation, wildlife sightings or other services.
9. Select Accurate Attributes
Attributes should help the right travellers discover your package.
10. Review Before Submission
Always check the entire package before submitting it for activation.
Need Help?
If you need assistance creating or managing your tour package, contact the ATX Africa support team.
Phone / WhatsApp: +255 688 855 977
Email: support@atxafrica.com
We are here to help tourism businesses present their experiences clearly and connect with potential customers and travel partners across Africa and beyond.
